appsmith
Appsmith Docker Image
The Appsmith Docker image is built with all the components required for it to run, within a single Docker container. Files in this directory make up for the scripts and template files needed for building the image.
You may choose to use the Appsmith cloud instance (at app.appsmith.com) or start your own using this image.
Appsmith Cloud
The fastest way to get started with appsmith is using our cloud-hosted version. It's as easy as
Self Host
The following subsections describe how you can get started with your own instance of Appsmith.
1. Prerequisites
Ensure docker and docker-compose are installed and available for starting containers:
- Install Docker: https://docs.docker.com/engine/install/
- Install Docker Compose: https://docs.docker.com/compose/install/
You may verify the installation by running docker --version and docker-compose --version. The output should roughly be something like below:
$ docker --versionDocker version 20.10.7, build f0df350$ docker-compose --versiondocker-compose version 1.29.2, build 5becea4c2. Docker compose configuration
Create a folder called appsmith (or some other name that you like), which will serve as our installation folder. Inside this folder, create a docker-compose.yml file and copy the following content into it:
version: "3"
services:  appsmith:    image: appsmith/appsmith-ce    container_name: appsmith-ce    ports:      - "80:80"      - "443:443"    volumes:      - ./stacks:/appsmith-stacks    restart: unless-stopped  #   # Uncomment the lines below to enable auto-update  #   labels:  #     com.centurylinklabs.watchtower.enable: "true"
  # auto_update:  #   image: containrrr/watchtower  #   volumes:  #     - /var/run/docker.sock:/var/run/docker.sock  #   # Update check interval in seconds.  #   command: --schedule "0 0 * ? * *" --label-enable --cleanup  #   restart: unless-stopped
Note: To enable auto-update for Appsmith, please uncomment all the commented lines in the docker-compose file.
After saving this file, cd to the folder that contains this file and run the following command to start Appsmith:
docker-compose up -dThis command may take a few minutes to download the docker image and initialize the application. Appsmith should soon be available at http://localhost.
You can check if application is running correctly by running docker ps or docker-compose ps (running docker-compose will require you to be in the directory containing the docker-compose.yml file to work).
$ docker psCONTAINER ID IMAGE COMMAND CREATED STATUS PORTS NAMES3b8f2c9638d0 appsmith/appsmith "/opt/appsmith/entrypoint.sh" 17 minutes ago Up 17 minutes 0.0.0.0:80->80/tcp, 0.0.0.0:443->443/tcp appsmithYou can also use the Supervisord UI to monitor and manage the different processes inside the container. This is discussed further below.
Custom Domain
To make Appsmith available on a custom domain, please update your domain's DNS records to point to the instance running Appsmith. Most domain registrars / DNS-providers have documentation on how you can do this yourself.
Custom SSL Certificate
In our container, we support to generate a free SSL certificate If you have your owned certificate, please follow these steps to use it inside the container.
- Firstly, please rename your certificate file as
fullchain.pemand key file asprivkey.pem - Then, copy these files into the sub-directory
<mounting-directory>/ssl/(Note: Please change<mounting-directory>by the mounting volume directory in thedocker-compose.yml. Default is./stacks) - Restart the container using
docker restart appsmith
The container will check the certificate files in the folder <mounting-directory>/ssl and use them if they are existed.
Note: In case of the certificate files have different name from fullchain.pem and privkey.pem, it will be considered as missing custom certificate and auto-provisioning the certificate by Let's Encrypt
Instance Management Utilities
The image includes an appsmithctl command to help with the management and maintenance of your instance. The following subsections describe what's available.
Export database
The following command can be used to take a backup dump of Appsmith's database. This can be restored onto another instance using the import command (discussed below) to restore all data.
Before running this, ensure you are in the directory where docker-compose.yml is located.
docker-compose exec appsmith-ce appsmithctl export_dbThe output file will be stored in the container directory /appsmith-stacks/data/backup/appsmith-data.archive. Thanks to the volume configuration in the docker-compose.yml file, it should be available on your host machine at ./stacks/data/backup/appsmith-data.archive.
If your volume configuration is different or unavailable, you can use the following command to copy the archive file to your host disk:
docker-compose cp appsmith-ce:/appsmith-stacks/data/backup/appsmith-data.archive .Note that you may want to save the docker.env file in addition to this archive file, if you intend to be able to reproduce this environment elsewhere, or in case of a disaster. This file can be copied out of the container with the following command:
docker-compose cp appsmith-ce:/appsmith-stacks/configuration/docker.env .Be sure to keep this file safe, since it contains information that can be used to decrypt datasource information from the database archive.
Import database
The following command can restore backup archive, that was produced by the export command (discussed above).
First, copy the archive file into the container using the following command:
docker-compose cp ./appsmith-data.archive appsmith-ce:/appsmith-stacks/data/restore/Second, run the following command to import data from this file:
docker-compose exec appsmith-ce appsmithctl import_dbNote that when you restore, you may also want to copy a docker.env from the original instance into this one. You can use the following command to do this (assuming you are in the installation folder and docker.env exists in the same folder):
docker-compose cp ./docker.env appsmith-ce:/appsmith-stacks/configuration/This will need a restart of the Appsmith server, which can be done using the following command:
docker-compose exec appsmith-ce supervisorctl restart backendMigrate To New Server
To migrate a running container to a new server or other machine, you can use the following migrate command and replace the <user> and <new-server-ip-address> by the user and IP address of the destination server or machine.
docker exec appsmith-ce appsmithctl migrate <user>@<new-server-ip-address>
This command will migrate all data and configuration of running container on source machine to destination machine and start a new container on destination machine.
Supervisor
The container runs multiple processes, including the Appsmith server, Nginx, MongoDB etc., inside a single Docker container. These processes are started and managed by supervisord.
Supervisord comes with a web interface for managing the various processes, available at http://localhost/supervisor/, as well as a command line interface towards the same goal.
Here's a screenshot of the web interface listing all the processes managed:
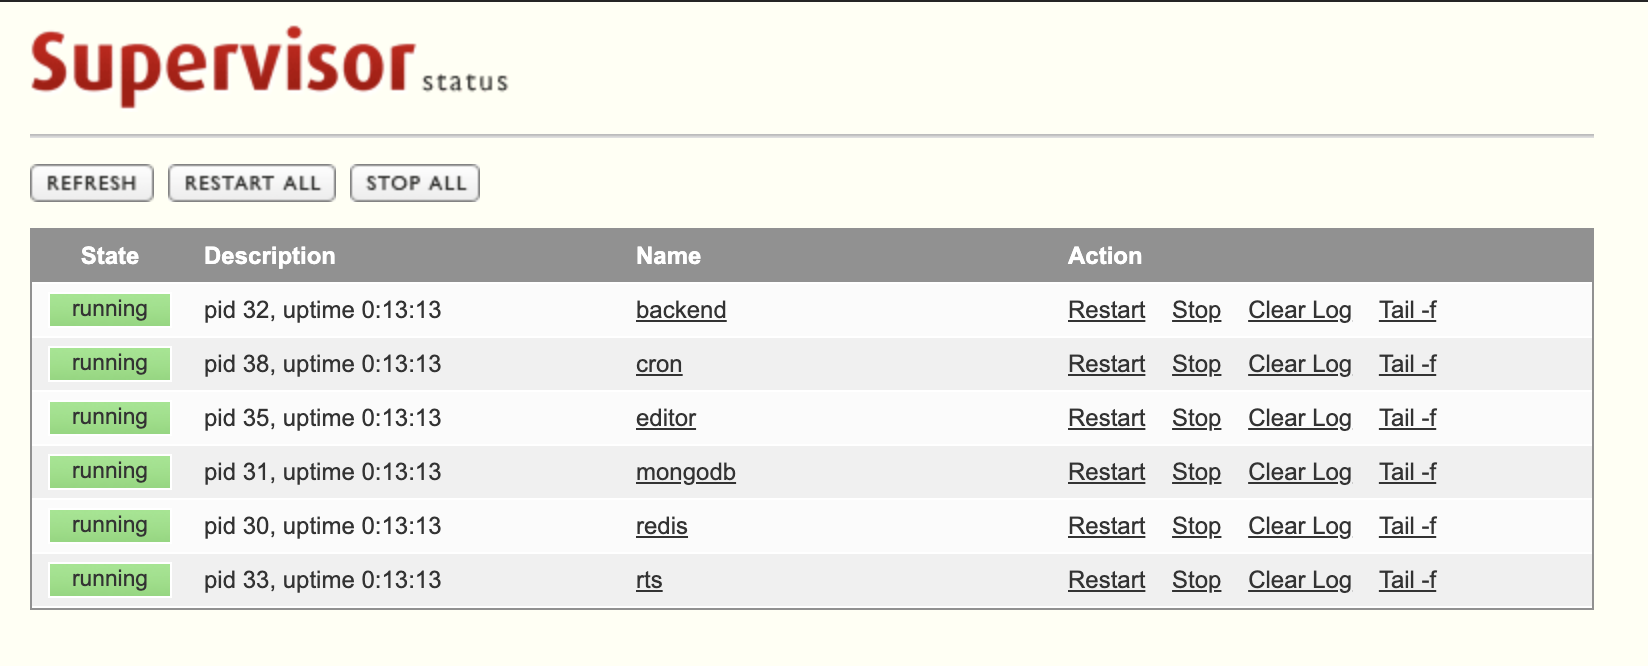
The command line interface can also be used to perform operations like restarting the Appsmith server, or restarting Nginx etc. For example, the following command (run in the installation folder) can be used to get a status of all running processes:
docker-compose exec appsmith-ce supervisorctl statusOr to view the last few lines of stderr output of one of the processes:
docker-compose exec appsmith-ce supervisorctl tail backend stderrTo learn more, please refer to Supervisor's documentation on what actions are available to be performed by the command line interface.
Troubleshooting
If you encounter any errors during this process, please reach out to support@appsmith.com or join our Discord Server and reach out on the #support channel.